Commit בעזרת GPT 🪄
“אנחנו אוהבים לתעד את שינויי הקוד שלנו״ (אמר אף אחד) - הכירו את GPiT, העוזר האישי לתיעוד שינויי קוד בצורה מהירה, מאובטחת ונוחה. במאמר זה אפרט את תהליך הלמידה שלי, אסביר כל שלב עד שנגיע לשלב שהחבילה שבנינו זמינה להורדה באתר PyPI.
הכנתי סרטון קצר שמדגים שימוש בספריית GPiT. מה שמוצג הוא repository עם שינויים, שמוכנסים למודל GPT-4 ומייצר טקסט שמסביר את מהות שינוי הקוד. המשתמש יכול ליצר אוטומטית טקסט חדש, לערוך אותו, ולהעלות את השינוי ל-repository.
לפני הכל 🕊️ #
כבר יותר מארבעה חודשים אנו נמצאים בעיצומה של מלחמה, וכמו רבים מחבריי, גם אני משתתף בה כמילואימניק פעיל. החלטתי לחזור לכתיבה, להשתתף ב-Meetups ולהכיר אנשים חדשים. תהיות רבות ליוו אותי בהחלטה הזו, אך בסופו של דבר הבנתי שכך אוכל לראות את האור ולשלב חיי שגרה ככול האפשר. כולי תקווה שכלל החטופים והחטופות יחזרו בבטחה, יחד עם הלוחמים שמקריבים כל כך הרבה עבור המדינה.
ניהול גירסאות 💾 #
רקע #
כולנו מכירים את המצב שבו כותבים מסמך, רוצים לשמור גירסה ומוסיפים תו לגרסה החדשה; מסמך1, מסמך2, מסמך3 וכו׳. שיטת העבודה הזו מובילה לעודף נתונים, כפילויות, חוסר תיעוד לשינויים ובעיקר חוסר שליטה בבלאגן. עכשיו תחשבו על אותו הדבר, רק במסמך שאנחנו כותבים עם עוד מספר אנשים.
Version Control כשמו כן הוא, שולט בשינויים של קבצים ומאפשר לעבוד במשותף עם מפתחים נוספים על אותם הקבצים. בזמן הפיתוח, ניהול השינויים מתקיים ברמה המקומית של המחשב, וכאשר נרצה לעלות את השינויים לפרוייקט המשותף נעבוד עם שירות Distributed Version Control Systems, כגון Git.
git diff #
על מנת שנוכל להבין איך Git עוקב אחרי שינויים בקוד, ניקח דוגמא בסיסית. נפתח תיקייה חדשה שפתחנו בשם /learn-git, ונריץ את הפקודה git init, ובכך נגדיר repository חדש וריק.
~/learn-git$ git init
Initialized empty Git repository in ~/learn-git/.git/
לאחר מכן, בעזרת פקודת echo, נגדיר קובץ טקסט ובו כתוב “hello”. נעלה את הקובץ החדש ל-repository.
~/learn-git$ echo hello > file.txt
~/learn-git$ git add .
~/learn-git$ git commit -m "initial"
[master (root-commit) 865ed74] initial
 1 file changed, 1 insertion(+)
 create mode 100644 file.txt
אחרי שהעלנו גרסה ראשונית, נעשה שינוי קטן. נוסיף למילה ״hello״ את המילה “world”, כך שעכשיו קובץ הטקסט מכיל “hello world” בשורה הראשונה. עכשיו כאשר יש לנו הבדל בין הגרסה המקומית והגרסה ב-repository, נבדוק מה היה השינוי בעזרת הפקודה git diff.
~/learn-git$ git diff
diff --git a/file.txt b/file.txt
index ce01362..3b18e51 100644
--- a/file.txt
+++ b/file.txt
@@ -1 +1 @@
-hello
+hello world
מה שאנחנו רואים זה שאנחנו משווים בין שתי גרסות של אותו הקובץ: a ו-b, ואת מהות השינוי; מחיקה של השורה הראשונה, והחלפתה בשורה אחרת. בהמשך נשתמש באותה הפקודה (עם תוספות קטנות), על מנת להכניס למודל את השינויים של הקוד.
מודל שפה 🎙️ #
Prompt Engineering #
סיימנו את החלק הראשון, החלק בו אנחנו בודקים מה היה השינוי בקוד. השלב השני, הוא להתנסות ולחבר וריאציות של הנחיות (Prompts), בניסיון להגיע להנחיה המדוייקת לתיעוד אוטומטי בעזרת מודל שפה. לאחר ניסיונות רבים, זה מה שאני הצלחתי:
I need a detailed and specific commit message for the following Git code changes.
The message should reflect the actual code modifications, improvements, or fixes made.
Please provide the message in JSON format, with distinct sections for a summary
message, bullet points detailing specific changes, and any necessary warnings about
the code, such as potential issues or areas needing attention.

Changes:
--- a/file.txt
+++ b/file.txt
@@ -1 +1 @@
-hello
+hello world

The response should be technically specific, aligning closely with the provided code changes, and
avoiding generic or placeholder text.
Be concise and on-point, without providing excess information.
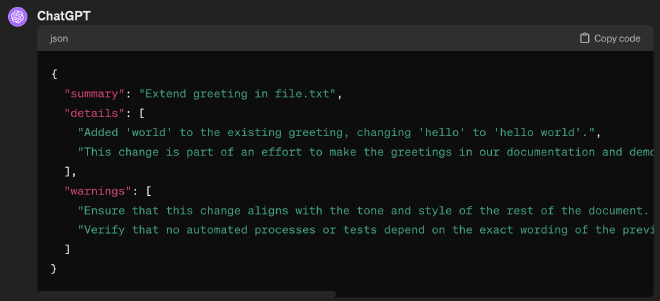
לשם ההדגמה הפשוטה, הכנסתי את השינוי הקטן שעשינו לקובץ file.txt. מציע לכם להציץ בתמונה שהוספתי. כמה חיסכון של זמן ותסכול זה יכול לחסוך לנו - הרבה, נכון?

GPT-4 Turbo’s JSON Mode #
אני אוהב להתייחס למודלי שפה גדולים כסוס פרא. לא תמיד נוכל לחזות איך הם יתנהגו. אם נרצה לקרוא למודל שפה ולהשתמש בפלט שלו, נצטרך להכריח אותו לענות לנו בפורמט שנוכל לקרוא בנוחות. תוכלו לראות בהנחיה שכתבתי; Please provide the message in JSON format. עם זאת, לא נוכל לדעת בוודאות שהדרך הזו תמיד עובדת. לפעמים נוכל לקבל משפט מקדים שיקשה עלינו, כמו במקרה הזה:

בנובמבר 2023, OpenAI השיקו את המודל המהיר GPT-4 Turbo. יחסית ל-GPT-4, המודל החדש מהיר וזול יותר. בשורה יותר משמעותית היא שהמודל החדש יכול להחזיר פלט בפורמט JSON תקין, בעזרת ציון response_format מסוג json_object. מדובר על בשורה שקידמה את היכולת לשלב מודל השפה GPT במערכות.
על מנת שהמצב יעבוד, החלטתי להוסיף להנחיה שלנו הדרכה נוספת עד לפרט האחרון; מה הפורמט של JSON שאנחנו רוצים לקבל בפלט, והסבר מדוייק לכל שדה. בעזרת ההדרכה הנוספת הזו נקבל פלט אחיד עם התנהגות דומה.
...
Please format the response as follows:
{{
    "message": "A concise summary, specifically describing the key change or improvement. Must be 72 chars or less",
    "bullets": [
        "Specific detail about a particular code change, including file and function names if applicable",
        "Description of another specific change, noting how it affects the functionality or structure of the code",
        ...
    ],
    "warnings": [
        "Optional. Necessary warnings or notes of caution about specific parts of the changes",
        ...
    ]
}}
Let’s Code 🤩 #
הקדמה #
חילקתי את המימוש של הקוד לבלוקים עצמאיים, אותם נפתח בנפרד ונחבר בסוף. חשוב לי להגיד שהחלטתי להתמקד על קטעי הקוד המשמעותיים של הפרוייקט, לפרוייקט המלא מזמין אתכם לבקר ב-Github Repository בו כתבתי תיעוד לקוד והדגמה לשימוש בו. נתחיל?

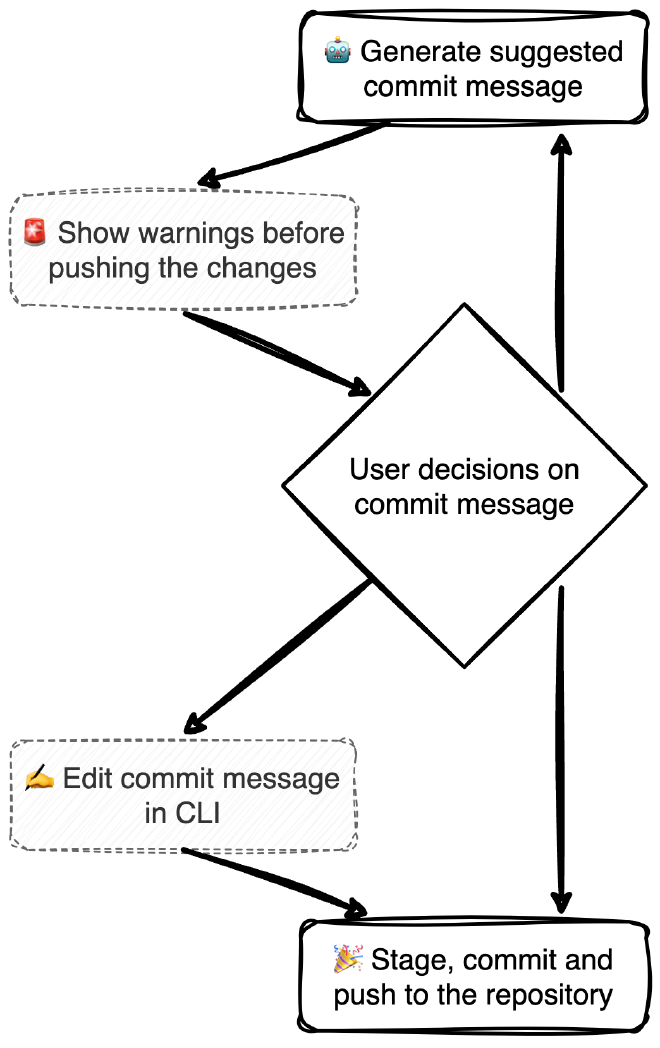
🤖 Generate suggested commit message #
על מנת שנוכל לדעת מה השינוי היה, נשווה בין כל קובץ שהועלה ל-stage, לבין הגרסה שלו ב-commit האחרון. בעזרת name-only-- נקבל כרשימה נתיבים של הקבצים (ביחס למיקום של ה-repository) שהשתנו מאז ה-commit האחרון:
git diff --cached --name-only
אחרי שיש לנו את ה-Paths של הקבצים, נבדוק מה היו בפועל השינויים לכל קובץ.
git diff --cached { path }
באמצעות מודול subprocess, נוכל לשלוח פקודות shell ולקבל את התוצאה שלהן. פונקציית get_git_diffs מממשת את הפקודות שתיארתי כאן, בעזרת שימוש בפונקציית check_output:
# class: `git_commands`
def get_git_diffs():
    """Get diffs of staged changes in the repository."""
    subprocess.run(['git', 'add', '.'])  # Ensure all changes are staged
    changed_files = subprocess.check_output(['git', 'diff', '--cached', '--name-only']).decode().splitlines()
    diff_output = ""

    for file in changed_files:
        diff_output += f"\n📄 {file}\n"
        diff_output += "-" * len(file) + "\n"
        file_diff = subprocess.check_output(['git', 'diff', '--cached', file]).decode()
        diff_output += file_diff + "\n"

    return diff_output
עכשיו שיש לנו את השינויים שכל קובץ עבר מאז ה-commit האחרון, נוכל לתשאל את GPT-4 וליצר commit message:
- API Key - נקרא ל-OpenAI דרך קריאת HTTPS פשוטה לשרת. צריך לזכור לשמור מראש בקובץ
env.מקומי את המפתח ל-api. אפשר גם להשתמש בפקודת shell בשםexportששומרת זמנית את המפתח. - Prompt - נשתמש בהנחיה זהה למה שהשתמשנו בהתחלה בתהליך Prompt Engineering. מזכיר שהוספנו JSON שמדייק את המבנה של הפלט;
messageיכיל את מהות השינוי,bulletsיכיל פירוט מתומצת של השינויים,warningsיכיל הזהרות לפני העלאת הקוד. מניסיוני, ככול שיותר נדריך (עד מידה מסויימת) את המודל, כך נקבל תוצאות מדוייקות ואחידות. - API Call - נבצע קריאת
POSTל-OpenAI. שימו לב שהגדרנוjson_objectלפורמט פלט המודל. - עיבוד התוצאה - מתוצאת הקריאה נוציא את ה-JSON ונחזיר את התוצאה.
# class: `openai_integration`
def generate_commit_message(diffs):
    """Generate a commit message using GPT-4 and format the response as JSON."""
    # 1. Environment Setup: Retrieve API Key
    openai_api_key = os.getenv("OPENAI_API_KEY")
    headers = {
        'Content-Type': 'application/json',
        'Authorization': f'Bearer {openai_api_key}'
    }

    # 2. Prompt Construction: Define the request for GPT-4
    prompt = f"""
        I need a detailed and specific commit message for the following Git code changes.
        The message should reflect the actual code modifications, improvements, or fixes made.
        Please provide the message in JSON format, with distinct sections for a summary
        message, bullet points detailing specific changes, and any necessary warnings about
        the code, such as potential issues or areas needing attention.

        Changes:
        {diffs}

        Please format the response as follows:
        {{
            "message": "A concise summary, specifically describing the key change or improvement. Must be 72 chars or less",
            "bullets": [
                "Specific detail about a particular code change, including file and function names if applicable",
                "Description of another specific change, noting how it affects the functionality or structure of the code",
                ...
            ],
            "warnings": [
                "Optional. Necessary warnings or notes of caution about specific parts of the changes",
                ...
            ]
        }}

        The response should be technically specific, aligning closely with the provided code changes, and avoiding generic or placeholder text.
        Be concise and on-point, without providing excess information.
    """

    # 3. API Call: Send the request to OpenAI's API
    data = {
        "model": "gpt-4-1106-preview",
        "messages": [
            {"role": "system", "content": "You are an assistant, and you only reply with JSON."},
            {"role": "user", "content": prompt}
        ],
        "response_format": {
            "type": "json_object"
        }
    }

    response = requests.post(
        'https://api.openai.com/v1/chat/completions',
        headers=headers,
        data=json.dumps(data)
    )

    # 4. Response Handling: Parse and format the API response
    response_json = response.json()
    response_text = response_json['choices'][0]['message']['content']
    try:
        formatted_response = json.loads(response_text)
    except json.JSONDecodeError:
        formatted_response = {"message": "Failed to parse response", "bullets": []}

    return formatted_response
🚨 Show warnings before pushing the changes #
לפני הצגת הודעת מהות השינוי למשתמש, נציג אזהרות שהמודל חשב שיהיו רלוונטיים. זה עזר לי לתפוס באגים וטעויות שלא באמת רציתי לעלות ל-commit. לדוגמא: מפתחות של API בקוד, סוגריים פתוחים ושגיאות כתיב. לשם כך ניגש ל-key בשם warnings, ונדפיס את רשימת המשפטים השמורים בו.
# class: `main`
suggested_message_json = generate_commit_message(diffs)
suggested_message_json.get("warnings", [])
print_warnings(warnings)

# class: `cli_utilities`
def print_warnings(warnings):
    """Prints warnings in a formatted manner."""
    if warnings:
        for warning in warnings:
            print(f"- {warning}")
    else:
        print("\n✅ No warnings.")
🤔 User decisions on commit message #
פונקציית format_commit_message_from_json תעבד את ה-JSON שקיבלנו מ-GPT. לאחר מכן, נציג אותו למשתמש ונאפשר לו לבחור:
- 1️⃣ - להשתמש בתיעוד המוצע.
- 2️⃣ - לבקש נוסח אחר לתיאור השינויים.
- 3️⃣ - לערוך ידנית את הודעת מהות השינוי.
# class: `openai_integration`
def format_commit_message_from_json(commit_json):
    """Format the commit message from JSON to a string."""
    message_str = commit_json.get("message", "")
    bullets = commit_json.get("bullets", [])

    formatted_bullets = "\n".join(f"- {bullet}" for bullet in bullets)
    return f"{message_str}\n\n{formatted_bullets}"
# class: `main`
print("📬 Suggested commit message:")
suggested_message = format_commit_message_from_json(suggested_message_json)
print(suggested_message)

print("\n👇 Choose an action:")
user_decision = input("1️⃣ Use the current commit message\n"
                      "2️⃣ Generate a new commit message\n"
                      "3️⃣ Edit the current commit message\n"
                      "Your choice (1/2/3): ").strip()

if user_decision == '1':
    commit_message = suggested_message
    break
elif user_decision == '2':
    continue
elif user_decision == '3':
    commit_message = edit_message_in_editor(suggested_message)
    break
else:
    print("❌ Invalid choice. Please enter 1, 2, or 3.")
✍️ Edit commit message in CLI #
למעט עריכה, הקוד מסביר את עצמו. האמת שלקח לי זמן לחשוב איך אני רוצה לאפשר למשתמש לערוך את הטקסט שנוצר, ונתקלתי ב-Nano, דרכו אפשר לערוך ישירות ב-CLI. נשמור בקובץ זמני את הטקסט שנוצר, נכניס אותו ל-Nano ונקרא את התוצאה. לאחר מכן נמחק את הקובץ הזמני.
# class: `cli_utilities`
def edit_message_in_editor(message):
    """Open the message in a text editor (Nano) for editing."""
    with tempfile.NamedTemporaryFile(suffix=".tmp", delete=False, mode='w+') as tf:
        tf_path = tf.name
        tf.write(message)
        tf.flush()

    editor = os.getenv('EDITOR', 'nano')  # Use Nano or the default editor set in the environment
    subprocess.call([editor, tf_path])

    with open(tf_path, "r") as tf:
        edited_message = tf.read()

    os.remove(tf_path)  # Clean up the temporary file
    return edited_message
🎉 Stage, commit and push to the repository #
אחרי שיש לנו הודעה שמסבירה בפשטות את השינוי שבוצע לקוד, נוכל להעלות אותו ל-repository! אם תסתכלו בקוד המלא, תוכלו לראות שהוספתי בדיקות נוספות, כך שנוכל לעמוד במקרי קצה.
# class: `git_commands`
def stage_changes():
    """Stage all changes in the repository."""
    subprocess.run(['git', 'add', '.'])

def commit_changes(commit_message):
    """Commit changes with a given message."""
    subprocess.run(['git', 'commit', '-m', commit_message])

def push_changes(branch_name='main'):
    """Push changes to the remote repository."""
    subprocess.run(['git', 'push', 'origin', branch_name])
העלאת GPiT ל-🆙 PyPI #
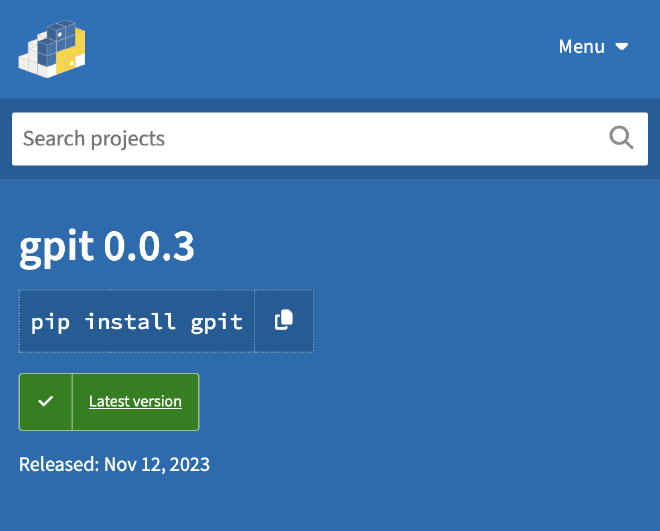
עכשיו שסיימנו לבנות את אבני הבניין של GPiT, נוכל להעלות אותה כספריה לאתר PyPI לניהול ספריות, כך שנוכל להוריד אותה באמצעות הפקודה pip install.
setup.py #
הקובץ הראשון שנפתח יגדיר מה הגרסה של החבילה שאנחנו מעלים, ספריות נדרשות, מיקום פונקציית main ועוד פרטים נוספים אודות המפתח והפרוייקט. שימו לב שאפשר להוסיף חיבור ישר ל-README.md של ה-repository, כמו שעשיתי בקוד המלא. הקובץ הזה יהיה מחוץ לתיקייה עם כלל קבצי ה-Python שמכילים את הספריה עצמה - הוא “מנהל” את תהליך העלאת הספריה.
# class: `setup`
setup(
    name='gpit',
    version='0.0.3',
    packages=find_packages(),
    install_requires=[
        'requests',
    ],
    entry_points={
        'console_scripts': [
            'gpit=gpit.main:main',
        ],
    },
    author='Ofir Steinherz',
    author_email='ofir.steinherz@gmail.com',
    description='GPT-Powered Commit Assistance'
)
init__.py__ #
קובץ המסמן תיקייה כחבילה של Python ומאפשר זיהוי וייבוא המודולים ממנה. במקרה שלנו הוא יהיה קיים אבל ריק מתוכן.
Makefile #
קובץ Makefile עוזר בתהליכי פיתוח ומייעל את העבודה. למדתי את השימוש בו כחלק מפרוייקט CI/CD בו הקובץ עזר לי לייעל תהליכי build לפרוייקטים עם Github Actions. מאז אותו הפרוייקט אני אוהב לעשות בו שימוש. נשתמש בקובץ זה לשרשר פקודות shell כך שנוכל להריץ אותם בפקודה אחת פשוטה ולא את אחרי השניה בצורה ידנית.
install #
על מנת שנוכל לוודא שאנחנו מעלים את כלל הספריות הנדרשות להרצה של הספריה לאתר, נבצע קריאה להתקנה. עכשיו אתם בטח שואלים מה זה אומר הנקודה הזו? איפה השמות של הספריות? אז מה שמעניין, זה שהפקודה הולכת לקובץ setup.py, ושם הגדרנו את הספריות שצריך להתקין. כך נוכל לוודא שוב שהכל מותקן כמו שצריך.
install:
  #Install the package
	pip install .
clean #
על מנת שנעלה את הקוד נקי ללא קבצים שנוצרו בגרסה הקודמת, נצטרך למחוק קבצים שנוצרו כחלק מהבנייה של הגרסה הקודמ וקבצי metadata שונים.
clean:
	#Clean unnecessary package upload generated files
	rm -rf dist/
	rm -rf build/
	rm -rf *.egg-info
	find . -name '__pycache__' -exec rm -rf {} +
upload #
לקראת העלאת הספריה לאתר, נוודא שאין קבצים ישנים (פעם נוספת), ולאחר מכן נבנה את הספריה שלנו ונעלה אותה לאתר!
upload:
	#Upload new version to PyPI
	rm -rf dist/
	python3 setup.py sdist bdist_wheel
	twine upload dist/*
סיכום 🥳 #
סיימנו! אם נסכם, למדנו איך עוקבים אחרי שינויי קוד בעזרת git diff, איך מקבלים פלט של מודל השפה GPT-4 בפורמט אחיד, ואיך מעלים ספריות לאתר PyPI. נתראה במאמר הבא!
