The Automatic Transcriber 🤖
You know when you get a voice message and really don’t feel like listening to it? When you wish someone else would do it for you? Meet Tekatzer, the bot built for exactly that. The bot takes a recording, no matter how long it is, then transcribes and summarizes it.
Data Pipeline #
Plan A #
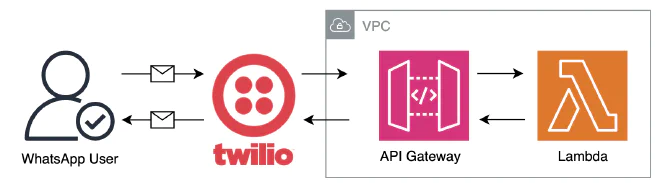
When I started out, I thought this would be a simple process. A user sends a message to the bot, the bot calls a Lambda function, which returns the result to the bot and then to the user.
Plan B #
After implementing everything and getting it working perfectly with my own short recordings, I tried sending a one-minute recording. That’s when I ran into Twilio’s timeout, which is set to 10 seconds and cannot be changed. As you can imagine, I ended up changing the entire pipeline so it would work regardless of the recording’s length.
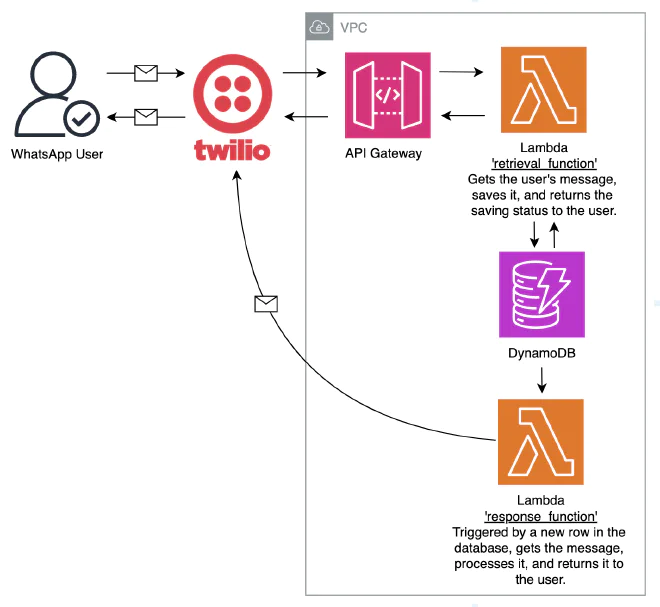
As you can see, the core of the pipeline stayed the same. However, I added an automatic trigger that calls an external Lambda function, so we’re no longer constrained by Twilio’s timeout. A few words about Twilio, and then we’ll get started.
Twilio #
Building a WhatsApp bot requires integrating with WhatsApp. Meta has a dedicated API, but I decided to work with Twilio, which claims to make WhatsApp more accessible. In hindsight, I might have worked directly with the official API.
WhatsApp Sandbox #
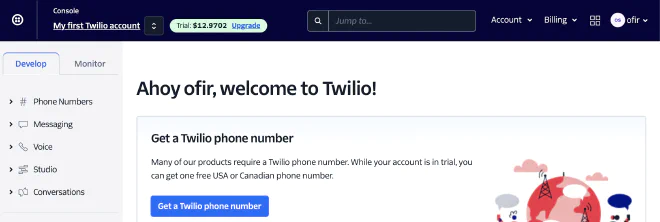
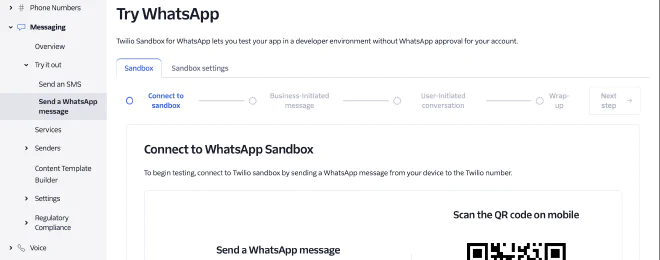
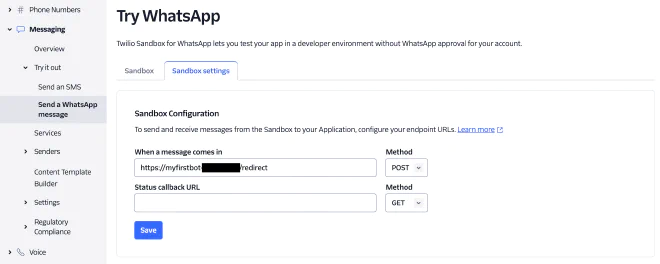
Twilio’s interface is simple and basic. In the WhatsApp Sandbox, we can configure a number so that a webhook runs whenever it receives a message.
In our number’s settings, we can configure an endpoint to be called automatically whenever a message is received. I used Twilio Functions, which is built into their site, and named the function redirect/.
Functions and Assets #
The next step is to create redirect/. Let’s walk through each part of the code. As a reminder, this function’s purpose is to call AWS API Gateway to insert the new message into DynamoDB, and return a status to the user indicating whether we managed to save it.
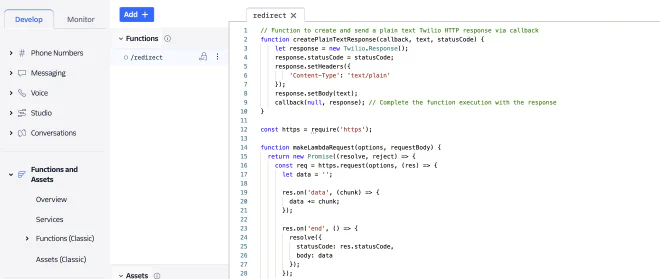
The code we wrote contains a main function and two helper functions.
exports.handler is the main function. It is responsible for receiving a response and sending it to Lambda so we can save it. It receives context, which contains the keys, event, which contains the message details, and callback, which contains a reference to the response. The function wraps the message we received in requestBody, calls AWS API Gateway through makeLambdaRequest, receives a response indicating whether we managed to save the message, and returns the status to the user using createPlainTextResponse.
exports.handler = async function(context, event, callback) {
  const apiUrl = new URL(context.endpoint_url);
  const voiceRecordingUrl = event.MediaUrl0;
  const textMessage = event.Body;
  const fromNumber = event.From;
  const toNumber = event.To;

  let requestBody = JSON.stringify({
    voiceRecordingUrl: voiceRecordingUrl,
    textMessage: textMessage,
    fromNumber: fromNumber,
    toNumber: toNumber,
  });

  console.log("Sending Body to Lambda: ", requestBody);

  const options = {
    hostname: apiUrl.hostname,
    path: apiUrl.pathname,
    method: 'POST',
    headers: {
      'x-api-key': context.lambda_key,
      'Content-Type': 'application/json',
      'Content-Length': Buffer.byteLength(requestBody)
    }
  };

  try {
    // Await the Lambda request and get the response
    const lambdaResponse = await makeLambdaRequest(options, requestBody);
    console.log("Lambda response received:", lambdaResponse);

    // Use the Lambda response to inform your Twilio response
    let responseMessage = "Request processed.";
    if (lambdaResponse.statusCode === 200) {
      responseMessage += " Success.";
    } else {
      responseMessage += " There was an error.";
    }

    createPlainTextResponse(callback, responseMessage, 200);
  } catch (error) {
    console.error("Error invoking Lambda:", error);
    createPlainTextResponse(callback, "Error invoking Lambda function.", 500);
  }
};
The function createPlainTextResponse returns a message to the user.
// Function to create and send a plain text Twilio HTTP response via callback
function createPlainTextResponse(callback, text, statusCode) {
    let response = new Twilio.Response();
    response.statusCode = statusCode;
    response.setHeaders({
        'Content-Type': 'text/plain'
    });
    response.setBody(text);
    callback(null, response); // Complete the function execution with the response
}
The function makeLambdaRequest calls Lambda. In practice, it calls API Gateway, which makes the call to Lambda.
const https = require('https');

function makeLambdaRequest(options, requestBody) {
  return new Promise((resolve, reject) => {
    const req = https.request(options, (res) => {
      let data = '';

      res.on('data', (chunk) => {
        data += chunk;
      });

      res.on('end', () => {
        resolve({
          statusCode: res.statusCode,
          body: data
        });
      });
    });

    req.on('error', (error) => {
      reject(error);
    });

    req.write(requestBody);
    req.end();
  });
}
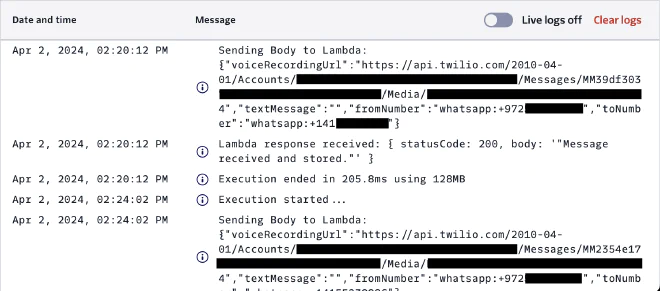
Twilio Functions has a live logs option. If we turn it on, we can see messages and the sequence of events in real time. This is very handy during development.
Terraform #
I’ve been working with the AWS Console since high school. It has never been convenient, whether in terms of the user interface or the ability to replicate environments. I wanted to use this project as an opportunity to build the infrastructure with Terraform, following an infrastructure as code approach. I used their CLI to run the file. Note that you need to authenticate with AWS so we can create infrastructure and connections between its components. I recommend granting specific permissions rather than Admin access.
AWS Provider #
Terraform supports a variety of cloud services, so we’ll specify that our cloud provider is AWS. I like working in their main region, without getting tangled up with services that aren’t available in Israel.
# Configure the AWS provider
provider "aws" {
  region = "us-east-1"
}
Lambda Functions #
One thing I avoid is putting SaaS service keys in the code. We can access them using variable. Make sure to store them in the environment, for example: "export TF_VAR_OPENAI_API_KEY="your_openai_api_key_here.
# ============ Lambda Functions ============

# Define environment variables for the Lambda function
variable "TWILIO_ACCOUNT_SID" {}
variable "TWILIO_AUTH_TOKEN" {}
variable "OPENAI_API_KEY" {}
We’ll define an IAM role for Lambda, which determines the permissions the functions will have. The role will be called assume_role_policy.
# Define the IAM role for the Lambda function
resource "aws_iam_role" "lambda_role" {
  name = "lambda_execution_role"

  assume_role_policy = jsonencode({
    Version = "2012-10-17",
    Statement = [{
      Action = "sts:AssumeRole",
      Principal = { Service = "lambda.amazonaws.com" },
      Effect = "Allow",
      Sid = "",
    }],
  })
}
For assume_role_policy, we’ll grant full access to the various services: AWSLambda_FullAccess for creating and working with Lambda, AWSLambdaBasicExecutionRole for logging, and AmazonDynamoDBFullAccess for connecting to the DynamoDB database.
# Attach policies to the Lambda role
resource "aws_iam_role_policy_attachment" "lambda_full_access" {
  role       = aws_iam_role.lambda_role.name
  policy_arn = "arn:aws:iam::aws:policy/AWSLambda_FullAccess"
}
resource "aws_iam_role_policy_attachment" "lambda_basic_execution_role" {
  role       = aws_iam_role.lambda_role.name
  policy_arn = "arn:aws:iam::aws:policy/service-role/AWSLambdaBasicExecutionRole"
}
resource "aws_iam_role_policy_attachment" "dynamodb_full_access" {
  role       = aws_iam_role.lambda_role.name
  policy_arn = "arn:aws:iam::aws:policy/AmazonDynamoDBFullAccess"
}
To process recordings and make HTTP requests, we’ll need to add libraries that aren’t built into Python to our environment. To do that, we’ll need to create a layer containing the various libraries. To upload libraries, we’ll need to create a zip file containing directories in a fixed structure:
./lambda-layer/
└── python/
    └── lib/
        └── python3.8/
            └── site-packages/
                ├── urllib3/
                ├── pydub/
                └── requests/
For this, I created a requirements.txt file specifying the libraries to download. Next, we’ll make sure that if this directory already exists, it is empty, and install the required libraries. Then we’ll create python-dependencies-layer.zip, containing all the libraries we want to upload to the layer.
# Define the path to the requirements.txt file
REQ_PATH="./requirements.txt"
TARGET_DIR="./lambda-layer/python/lib/python3.8/site-packages/"

# Step 1: Check if requirements.txt exists in the lambda_function directory
if [ ! -f "$REQ_PATH" ]; then
    echo "requirements.txt not found in the retrieval_function directory."
    exit 1
fi

# Step 2: Clean the target directory if it already exists
if [ -d "$TARGET_DIR" ]; then
    echo "Cleaning existing target directory: $TARGET_DIR"
    rm -rf "$TARGET_DIR"
fi

# Recreate the directory structure for the Lambda layer
mkdir -p "$TARGET_DIR"

# Step 3: Install packages from requirements.txt into the target directory
pip3 install -r "$REQ_PATH" -t "$TARGET_DIR"

# Step 4: Navigate to the lambda-layer directory and zip the contents
cd lambda-layer
zip -r ../python-dependencies-layer.zip .
Let’s return to our Terraform file, where we’ll define python_dependencies_layer containing the python-dependencies-layer.zip file we just prepared.
# Define a Lambda layer for Python dependencies
resource "aws_lambda_layer_version" "python_dependencies_layer" {
  filename   = "./python-dependencies-layer.zip"
  layer_name = "python_dependencies_layer"

  compatible_runtimes = ["python3.8"]

  description  = "Lambda layer with pydub and requests"
}
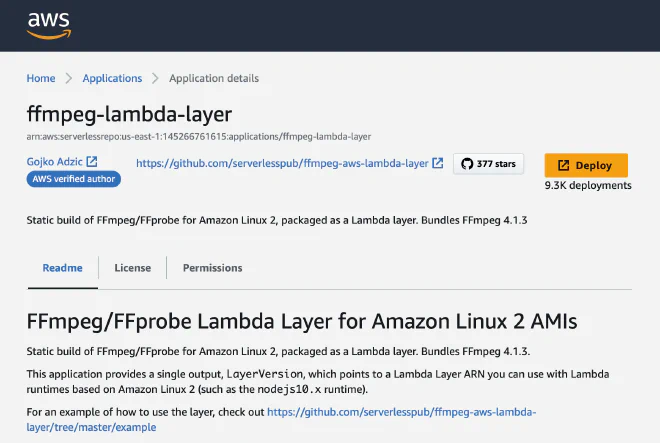
It’s important to note that the pydub library also needs ffmpeg to work. To add it to the code, I used a ready-made layer that I found in the AWS Serverless Application Repository.
Retrieval Lambda #
To upload the Lambda function, we’ll need to compress its code into a zip file. That’s what we’re doing now.
# Package the Lambda function code into a ZIP archive
data "archive_file" "retrieval_lambda_zip" {
  type        = "zip"
  source_dir  = "${path.module}/retrieval_function" # Directory path
  output_path = "${path.module}/retrieval_function.zip"
}
We’ll define our first Lambda function, which receives a message from Twilio and saves it in DynamoDB. The code is fairly straightforward: we define the function’s name, its handler (the main function), the Python version, and timeout. We also added the layers we defined earlier. We added our keys to environment so we can load them into the environment.
# Create the Lambda function
resource "aws_lambda_function" "retrieval_lambda" {
  function_name = "RetrievalFunction"
  handler       = "index.handler"
  role          = aws_iam_role.lambda_role.arn
  runtime       = "python3.8" # Adjust the runtime as necessary
  filename      = data.archive_file.retrieval_lambda_zip.output_path
  source_code_hash = filebase64sha256(data.archive_file.retrieval_lambda_zip.output_path)
  timeout = 60  # Set the timeout to 60 seconds (1 minute)

  layers = [
    "arn:aws:lambda:us-east-1:022438919154:layer:ffmpeg:1", # ffmpeg layer
    aws_lambda_layer_version.python_dependencies_layer.arn # dependencies layer
  ]

  environment {
    variables = {
      TWILIO_ACCOUNT_SID = var.TWILIO_ACCOUNT_SID
      TWILIO_AUTH_TOKEN  = var.TWILIO_AUTH_TOKEN
      OPENAI_API_KEY = var.OPENAI_API_KEY
    }
  }
}
Response Lambda #
For simplicity, the infrastructure for the first function, which saves messages, and the second function, which processes them, is identical, just with different names.
DynamoDB #
We’ll define a new table called MessagesTable, which will be serverless thanks to the PAY_PER_REQUEST setting. The key will be MessageID.
# ============ DynamoDB Table ============

# Create a DynamoDB table to store messages
resource "aws_dynamodb_table" "messages_table" {
  name           = "MessagesTable"
  billing_mode   = "PAY_PER_REQUEST" # Or you can use PROVISIONED for provisioned throughput
  hash_key       = "MessageID"

  attribute {
    name = "MessageID"
    type = "S" # S for String, N for Number, B for Binary
  }

  stream_enabled = true
  stream_view_type = "NEW_IMAGE" # Options are: KEYS_ONLY, NEW_IMAGE, OLD_IMAGE, NEW_AND_OLD_IMAGES

  tags = {
    Environment = "dev"
  }
}
Once we have a table, we’ll define a trigger that calls response_lambda whenever a new record is inserted into it.
# Define an event source mapping to trigger the Lambda function from the DynamoDB stream
resource "aws_lambda_event_source_mapping" "dynamodb_response_trigger" {
  event_source_arn  = aws_dynamodb_table.messages_table.stream_arn
  function_name     = aws_lambda_function.response_lambda.arn
  starting_position = "LATEST"
}
API Gateway #
To make things easier to remember when I return to the project and use it as a template for future projects, we’ll name the API example_api, with a resource named example. Then we’ll connect the resource to the function retrieval_lambda.
# ============ API Gateway ============

# Create an API Gateway REST API
resource "aws_api_gateway_rest_api" "example_api" {
  name        = "ExampleAPI"
  description = "Example API integrated with Lambda"
}

# Define a resource for the API
resource "aws_api_gateway_resource" "example_resource" {
  rest_api_id = aws_api_gateway_rest_api.example_api.id
  parent_id   = aws_api_gateway_rest_api.example_api.root_resource_id
  path_part   = "example"
}

# Define a method for the API resource
resource "aws_api_gateway_method" "example_method" {
  rest_api_id   = aws_api_gateway_rest_api.example_api.id
  resource_id   = aws_api_gateway_resource.example_resource.id
  http_method   = "POST"
  authorization = "NONE"
  api_key_required = true
}

# Integrate the API method with the Lambda function
resource "aws_api_gateway_integration" "lambda_integration" {
  rest_api_id = aws_api_gateway_rest_api.example_api.id
  resource_id = aws_api_gateway_resource.example_resource.id
  integration_http_method = "POST"
  http_method = "POST"
  type        = "AWS_PROXY"
  uri         = aws_lambda_function.retrieval_lambda.invoke_arn
  depends_on = [aws_api_gateway_method.example_method]
}
We’ll allow the API to call Lambda using AllowExecutionFromAPIGateway.
# Grant API Gateway permission to invoke the Lambda function
resource "aws_lambda_permission" "allow_apigateway" {
  statement_id  = "AllowExecutionFromAPIGateway"
  action        = "lambda:InvokeFunction"
  function_name = aws_lambda_function.retrieval_lambda.function_name
  principal     = "apigateway.amazonaws.com"
  source_arn    = "${aws_api_gateway_rest_api.example_api.execution_arn}/*/*"
}
Then we’ll deploy the API we built.
# Deploy the API Gateway
resource "aws_api_gateway_deployment" "example_deployment" {
  depends_on = [
    aws_api_gateway_integration.lambda_integration,
    # aws_api_gateway_method.example_method
  ]

  rest_api_id = aws_api_gateway_rest_api.example_api.id
  stage_name  = "v1"

  triggers = {
    redeployment = sha256(jsonencode(aws_api_gateway_rest_api.example_api.body))
  }

  lifecycle {
    create_before_destroy = true
  }
}
API Key and Usage Plan #
The next steps are to create an API key to improve security and connect it to a usage plan. Note that the key and endpoint URL will stay the same as long as we don’t delete and recreate the environment.
# ============ API Key and Usage Plan ============

# Create an API key for accessing the API
resource "aws_api_gateway_api_key" "example_api_key" {
  name = "example-api-key"
  description = "API Key for accessing Example API"
  enabled = true
}

# Create a usage plan for the API
resource "aws_api_gateway_usage_plan" "example_usage_plan" {
  name = "example-usage-plan"
  api_stages {
    api_id = aws_api_gateway_rest_api.example_api.id
    stage  = aws_api_gateway_deployment.example_deployment.stage_name
  }
}

# Associate the API key with the usage plan
resource "aws_api_gateway_usage_plan_key" "example_usage_plan_key" {
  key_id        = aws_api_gateway_api_key.example_api_key.id
  key_type      = "API_KEY"
  usage_plan_id = aws_api_gateway_usage_plan.example_usage_plan.id
}
Python Code #
Retrieval Lambda #
The function Retrieval is the first to interact with the user. Its purpose is to save the message it receives to a table (MessagesTable) and return the save status to the user. We’ll save it using the put_item operation, check whether it was saved successfully using ResponseMetadata, and return a response to the user accordingly.
import json
import uuid
import boto3

# Assuming you have configured DynamoDB access and the table is defined
dynamodb = boto3.resource('dynamodb')
table = dynamodb.Table('MessagesTable')

def handler(event, context):
    # Serialize the entire event
    event_body = json.dumps(event)

    # Store in DynamoDB
    try:
        response = table.put_item(
           Item={
                'MessageID': str(uuid.uuid4()),
                'EventBody': event_body  # Storing the entire event body
            }
        )
        # Check if the operation was successful
        if response.get('ResponseMetadata', {}).get('HTTPStatusCode') == 200:
            status_message = 'Message received and stored successfully.'
        else:
            status_message = 'Failed to store message.'
    except Exception as e:
        # Handle potential errors
        status_message = f'Error occurred: {str(e)}'

    return {
        'statusCode': 200 if 'successfully' in status_message else 500,
        'body': json.dumps(status_message)
    }
Response Lambda #
The function Response does all the heavy lifting: it receives the recording, processes it, and returns a summarized response to the user.
Imports and Dependencies #
import os
import json
import requests
from requests.auth import HTTPBasicAuth
from pydub import AudioSegment
from io import BytesIO

# Extract environment variables
twilio_sid = os.getenv('TWILIO_ACCOUNT_SID')
twilio_token = os.getenv('TWILIO_AUTH_TOKEN')
openai_key = os.getenv('OPENAI_API_KEY')
os: Used to interact with the runtime environment. We’ll use it to retrieve the keys for the APIs we use.json: Used to convert JSON formats, both encoding and decoding.request: Used to make secure HTTP requests.pydub: Used to convert between audio file formats.BytesIO: Lets us handle binary files, in our case, audio.- I added all the keys we’ll need in the code: the keys for Twilio and OpenAI.
Fetch MP3 from URL #
def fetch_mp3_from_url(url, twilio_sid, twilio_token):
    """Fetches an MP3 file from a given URL."""
    response = requests.get(url, auth=(twilio_sid, twilio_token))
    response.raise_for_status()  # Checks for HTTP request errors

    audio_ogg = AudioSegment.from_file(BytesIO(response.content), format="ogg")
    mp3_audio = BytesIO()
    audio_ogg.export(mp3_audio, format="mp3")
    mp3_audio.seek(0)
    return mp3_audio
This function’s purpose is to fetch the recording’s content and return it as an audio file. Twilio sends recorded messages through a URL, so the first thing we do is retrieve its content using our keys. We get an ogg file, which is a highly compressed audio file. Unfortunately, Whisper doesn’t yet support this format, so we’ll need to convert it to MP3. This task requires computing power, which is why we allocated a relatively large amount of memory to this Lambda function.
Transcribe MP3 to Text #
def transcribe_mp3_to_text(mp3_audio, openai_key):
    """Transcribes MP3 audio to text using OpenAI's API."""
    url = 'https://api.openai.com/v1/audio/transcriptions'
    headers = {'Authorization': f'Bearer {openai_key}'}
    files = {
        'file': ('audio.mp3', mp3_audio, 'audio/mp3'),
        'model': (None, 'whisper-1')
    }
    response = requests.post(url, headers=headers, files=files)
    mp3_audio.close()
    return response.text
Once we have the recording in a suitable format, we’ll call whisper to transcribe it for us.
Get OpenAI Response #
def get_openai_response(user_input, openai_key):
    system_prompt = """
        Summarize the voice recording transcription from a messaging app, focusing on the most exciting or
        significant updates as if you're recounting them to a friend. Capture the essence of the news or
        updates, maintaining the speaker's original perspective and tone. The original recordings are
        personal narratives, so ensure your summary reflects a first-person viewpoint.

        Please adhere to the following guidelines:
        - Directly Summarize: Provide a straightforward summary without introductions or conclusions. Jump
        right into the main points as if continuing an ongoing conversation.
        - Clear Language: The summary should be in Hebrew. Use English for any professional terms, ensuring
        they are widely recognized or standard in the field being discussed. If a direct Hebrew translation
        for a professional term is not commonly used or understood, keep the term in English.
        - Simplicity and Accessibility: Aim for a summary that is easy to understand without accessing the
        original recordings. Assume the listener has basic context but not detailed background information.
        - Avoid Assumptions: Base your summary strictly on the content of the transcriptions. Do not fill
        gaps with hypotheticals or assumptions about unmentioned details.
        - Response Format: Present your summary in plain text, focusing on content clarity and ease of reading.

        Your task is to distill the essence of the conversation into a compact summary that conveys the
        critical updates or news, reflecting the speaker's own words and feelings. Remember, the goal is
        to inform and engage, mirroring a natural, friendly update.
    """
    url = "https://api.openai.com/v1/chat/completions"
    headers = {
        "Content-Type": "application/json",
        "Authorization": f"Bearer {openai_key}"
    }
    data = {
        "model": "gpt-4-0125-preview",
        "messages": [
            {
                "role": "system",
                "content": system_prompt
            },
            {
                "role": "user",
                "content": f"Here is the transcription to summary: \n\n{user_input}"
            }
        ]
    }
    response = requests.post(url, headers=headers, data=json.dumps(data))

    if response.status_code == 200:
        response_data = response.json()
        # Extracting the content of the response
        content = response_data["choices"][0]["message"]["content"] if response_data["choices"] else "No content returned."
        return content
    else:
        print(f"Error: {response.status_code}")
        return f"Failed to get a response: {response.status_code}"
I wanted to make things interesting and summarize the recording after transcribing it. I wrote a relatively long prompt that tries to align the message sender’s point of view with the summary written by GPT-4. Going forward, I would add another layer that checks the recording’s point of view and then summarizes it from that perspective.
Send WhatsApp Message #
def send_whatsapp_message(twilio_sid, twilio_token, to_number, from_number, message_body):
    """Sends a WhatsApp message using Twilio's API."""
    url = f'https://api.twilio.com/2010-04-01/Accounts/{twilio_sid}/Messages.json'
    data = {
        'To': to_number,
        'From': from_number,
        'Body': message_body
    }
    response = requests.post(url, data=data, auth=HTTPBasicAuth(twilio_sid, twilio_token))
    return response
Sending a WhatsApp message to the user. We’ll use this function to let the user know we’ve finished transcribing the message, and then send the summarized message itself.
Process Record #
def process_record(record):
    """Process a single record from the DynamoDB stream."""
    if record['eventName'] == 'INSERT':
        try:
            new_image = record['dynamodb']['NewImage']
            event_body = json.loads(new_image['EventBody']['S'])
            message_details = json.loads(event_body['body'])

            from_number = message_details['fromNumber']
            to_number = message_details['toNumber']
            message_content = message_details.get('voiceRecordingUrl') or message_details.get('textMessage', '')

            if 'voiceRecordingUrl' in message_details:
                mp3_audio = fetch_mp3_from_url(message_content, twilio_sid, twilio_token)
                transcription = transcribe_mp3_to_text(mp3_audio, openai_key)
                message_content = transcription
                send_whatsapp_message(twilio_sid, twilio_token, from_number, to_number, "Message transcribed.")

            # Use OpenAI for further message processing if needed
            processed_message = get_openai_response(message_content, openai_key)

            send_whatsapp_message(twilio_sid, twilio_token, from_number, to_number, processed_message)

        except Exception as e:
            print(f"Error processing record: {e}")
When we receive a new record in DynamoDB, an automatic trigger fires, and then the function process_record is called. It uses all the helper functions we discussed earlier. The sequence is:
- Check that this is indeed a record insertion and not another change made to the table.
- Retrieve the new record’s content.
- Transcribe the recording into text.
- Summarize the text.
- Return a response to the user.
Lambda Handler #
def handler(event, context):
    print("Received event:", event)
    for record in event['Records']:
        process_record(record)
    return {'statusCode': 200, 'body': json.dumps({'message': 'Response processed successfully'})}
A single Lambda invocation can contain multiple message records, so before calling process_record, we’ll loop through all the records received.
Summary #
Through this project, I learned how to harness the language-processing capabilities of language models for everyday use, making processes more efficient and convenient. The biggest takeaway from my experience with this project was using Terraform, which helped me implement things faster and made working with AWS more convenient.