How to Build a Super-Fast Blog 🏃🏻♂️

We all know the different ways to start a personal blog: no-code website builders, building a site from scratch, and buying a prebuilt site. These solutions come with a few challenges:
Flexibility - Developers starting a personal site want as much flexibility as possible. Website builders tend to offer limited flexibility, which can get in the way, for example, when it comes to RTL support.
Speed - The time it takes to build a site manually can be the reason it never gets off the ground in the first place. Website builders also tend to be slow for various reasons.
Hassle
- Hosting the site - People building a site from scratch need to arrange hosting, which can sometimes be a major headache.
- Development languages - Developers who don’t work in web development aren’t necessarily interested in learning it.
Cost - Buying a prebuilt site can solve all the challenges I mentioned, but this solution comes at a high price.
So What’s the Solution? #
Meet Hugo, an open-source platform built with Google’s Go language. With Hugo, you can develop a static site with some of the best loading speeds and flexibility available. How does Hugo overcome these challenges?
- Content is written in Markdown, a quick and convenient format. Behind the scenes, Hugo builds the
.mdfiles intohtmlfiles. - Hugo offers free use of ready-made, open-source themes while prioritizing development flexibility.
- The combination of Hugo, a GitHub repository, and Netlify was a major reason I chose Hugo. More on that later.
Installing Hugo #
Follow the installation instructions for your operating system. I work on macOS and used Brew:
!brew install hugo
Creating a Site #
Setting Up a Site #
To create a new site, use the CLI to navigate to the location where you want to save it. There’s no need to create a folder; Hugo will take care of that.
!hugo new site mywebsite
The name of the site we created is mywebsite. The command created a basic skeleton for our site, without any content or styling.
Folder Structure #
After creating a new site, you’ll see that folders have been added under a parent folder named after our site. Before adding a theme, it’s important to understand the structure of a Hugo site:
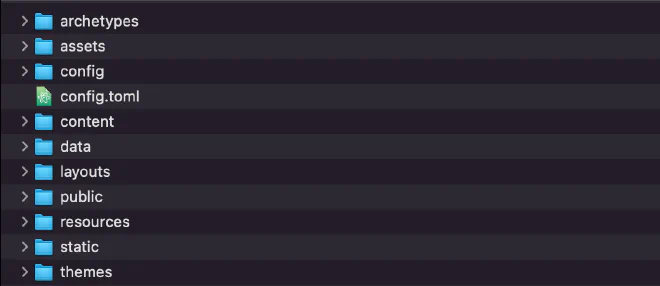
| Folder | Explanation |
|---|---|
| archetypes | Contains a default.md file that defines the basic format of an article. |
| assets | Image files used throughout the site, such as a logo, author photos, and so on. |
| config | Site configuration files. Used extensively to customize the site’s structure to suit our needs. |
| content | The heart of our site, containing all the articles and the images displayed in them. |
| data | Used for additional site settings. We won’t use this folder in this post. |
| layouts | Contains html files that let us override the theme and redefine the design. |
| public resources | Folders where Hugo exports files. We won’t use these folders in this post. |
| static | Contains the site’s static content, such as a favicon. |
| themes | The code for the theme we’ll use. |
Assets, Content, or Static folders.For further reading, see this article on the official site.
Adding a Theme to the Site #
Now that we’ve built the basic structure of our site, we’ll choose a theme that suits our needs. After some trial and error, I chose Congo.
Installing a Theme #
We need to download the theme using the submodule command. We’ll go to the Congo repo, then copy its contents into our site’s themes folder, under a folder named mywebsite.
Next, in the config.toml file in the root folder, we’ll change the theme name to congo.
!cd mywebsite
!git init
!git submodule add -b stable https://github.com/jpanther/congo.git themes/congo
!echo "theme = 'congo'" >> config.toml
!hugo server
Setting Up Configuration Files #
To edit the site’s basic settings, we’ll copy all the toml files from the theme’s config/_default folder into the corresponding folder in our site, config/_default.
themes folder. If we want to make changes, we’ll copy them into a corresponding folder in our site and edit them only there.Articles in Hugo #
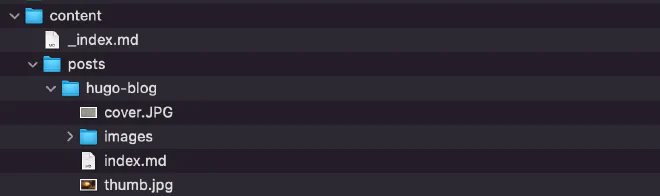
Now that we’ve created the site and downloaded our chosen theme, it’s time to publish our first article! As you may remember, we’ll store the site’s content in the content folder.
We’ll give each article its own folder containing a cover image, a thumbnail image, an images folder, and most importantly, a Markdown file for the content. Note that this file is named index.md.
Creating an Article #
We can create an article using a command Hugo provides for us:
!hugo new posts/my-first-post/index.md
After creating a new md file, we’ll add some content:
---
title: "My First Post"
date: 2022-12-07T09:03:20-08:00
draft: true
---
## Introduction

This is **bold** text, and this is *emphasized* text.
The first section, enclosed by --- (lines 1–5), is generated automatically based on the structure of the default.md file in the archetypes folder. In this section, we can define article-specific settings, such as title, date, draft status, author, and more. For a closer look at additional settings, see the official documentation, under the ____.article section.
In the second section (lines 6–8), we’ll write our article’s content in Markdown. I use Typora to speed up the article-writing process. To learn about writing Markdown files, I recommend this site.
Running the Site #
Now all that’s left is to check our new site. Notice that in the first section of the article, we set draft: true, so our article is a draft. To display all articles, we’ll account for that in the command we use to run the site.
!hugo server --buildDrafts
Flexibility! #
Go to the toml files under the config/_default folder in our site. These configuration files let us change many settings provided by our chosen theme. For each file, I’ll explain the relevant options we can change. Feel free to explore on your own, too! 😛
config.toml #
- We can update the
baseURLto match our domain. - We can update
defaultContentLanguage, which defines the site’s primary language.
languages.he.toml #
Your file name doesn’t contain he, but en instead, right? Rename it and see what happens. Hugo supports a variety of languages, including Hebrew! See the other supported languages. You can look in the themes/congo/i18n folder to see the Hebrew translation. Keep in mind that we’ll need to make a few adjustments, which I’ll cover later in the article.
markup.toml and module.toml #
Settings that support the proper functioning of Congo. We won’t change these settings.
menus.en.toml #
The site’s menu settings. We can add links to other pages on our site.
[[main]]
  name = "Blog"
  pageRef = "posts"
  weight = 10

[[main]]
  name = "Categories"
  pageRef = "categories"
  weight = 20
menu parameter(lines 1, 6) - The location where we want to add the menu link. We can add menus inmainandFooter.name parameter(lines 2, 7) - The link’s name.weight parameter(lines 3, 8) - By default,Congosorts the menu alphabetically. We’ll assign weights to arrange the menu in our preferred order.
params.toml #
The cherry on top 🍦: all the settings that Congo lets us change. We can change the base colors, add site-wide search, configure the appearance of the various layouts, and adjust a range of other settings. I suggest playing around with this file and seeing what changes!
Adding Hebrew Support #
Updating the Files #
After changing the language configuration file languages.he.toml, we’ll update its first few lines so that our site fully supports the new language.
languageCode = "he"
languageName = "Hebrew"
isoCode = "he"
weight = 1
rtl = true
Updating Tailwind #
Congo relies on Tailwind for fast, dynamic site styling as part of the class in html files. When I first built the site, I took the opportunity to work with this technology for the first time.
Tailwind is based on adding styling directly to the class. When I applied the site’s RTL settings, all the styling updated correctly except for the last section on the home page, which displays the latest articles. The spacing next to the image stayed on the right rather than moving to the left.
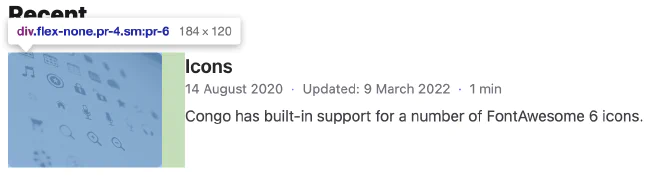
After some research, which involved browsing the site’s files through Inspect and looking for references to div in the source code, I realized that:
- The styling for that section is in the
article-link.htmlfile. pr-4means right-side padding fordiv.:smmeans styling specifically for small screens.- We need to copy the
article-link.htmlfile into the corresponding folder in our site,layouts/partials, and edit it so that the spacing is correct.
My Tips for Writing a Winning Article 🏆 #
Images #
To add images to an article, we’ll place them in the dedicated images folder. We can add them in several ways. figure is a kind of prebuilt design snippet that comes with Congo and lets us insert content. For similar snippets, see Shortcodes.

Code Snippets #
My personal preference is to store code snippets in GitHub Gists. Luckily, there’s built-in support in Congo. In the first part (line 2), we’ll enter our GitHub account name. The second part (line 3) refers to our gist’s ID, and the last part (line 4) refers to the gist’s name.
Working with GitHub #
I highly recommend working with GitHub. Through this site, you can manage your project using Git: track changes, collaborate with other developers, share your site’s code, and more.
!git status
!git add .
!git commit -m "Description"
!git push -u origin master
- Line 1 - We’ll check which files have changed since the last time we updated the project.
- Line 2 - We’ll add all the files to the staging area.
- Line 3 - We’ll add a description for the staged changes.
- Line 4 - We’ll push the changes to our GitHub repository.
Deploying the Site to Netlify #
After pushing the site to GitHub, we’ll go to Netlify and create an account. We need to give Netlify permission to access the repo where we store our Hugo site.
I suggest exploring the site yourself; it’s very intuitive and easy to use. When you change your site’s domain, make sure to update the baseURL in the config.toml file.
Conclusion #
Hugo has many advantages, but it also has drawbacks. I think this technology is a good choice for people looking for fast development and loading times, along with flexibility during development.