A Guide to Building an API with AWS 🌥️

Displaying the weather, getting the toll for the Fast Lane, and running artificial intelligence: what they all have in common is how they communicate: an API. APIs let developers connect different applications and software, expanding their product’s capabilities in the process. In this guide, we’ll build an API for storing item details together, step by step. I’ll explain the AWS services in depth, the functions we’ll build, and how we’ll connect everything securely.
Background 🤔 #
In recent years, website architecture has been undergoing a shift in thinking. The tech giants realized that the on-premises server approach wasn’t working and tried to find a solution. Their solution was to take on end-to-end management of the cloud and give developers a serverless experience. What does serverless solve?
- Pay only for what you use - Real-time billing based on actual resource usage, dynamically and with millisecond granularity.
- No maintenance - The cloud provider is responsible for managing hardware and software, reducing the workload and recurring tasks for the company’s DevOps staff.
- Resources - Resource allocation changes as needed, preparing customers for both decreases and increases in resource demand.
- Availability - Cloud providers have servers around the world, with established operating protocols that ensure full availability, even in extreme cases.
- Complexity - Allows developers to focus on the product rather than routine infrastructure and architecture maintenance.
Moving to serverless comes with challenges, and this approach isn’t suitable for every product or company. Read more on the subject.
The world’s largest cloud provider is AWS, followed by Azure and then GCP. Each service has advantages and disadvantages. Personally, I’ve been learning about AWS for quite a while, and I decided to focus on it in this post. To follow along with me, sign up for the AWS Console.
The Task 🎯 #
Our task is to build a standalone system that can manage a database of products securely and efficiently. I’ve written this guide with as many explanations, images, and visual illustrations as possible to help if this is your first encounter with AWS.
How? We’ll build a private API using API Gateway. We’ll use Lambda functions to perform CRUD operations on a DynamoDB table. To enable the connection between the function and the database, we’ll configure an IAM role. I’ve prepared a diagram that will accompany us throughout the guide.
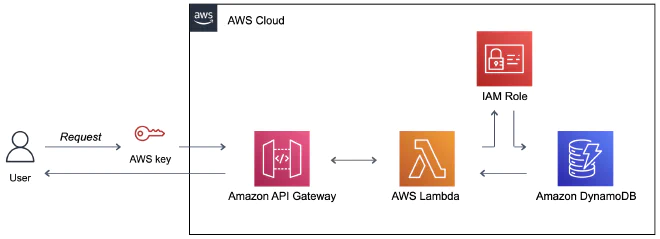
Sounds like Greek to you? Let’s learn together!
The Database ☁️ #
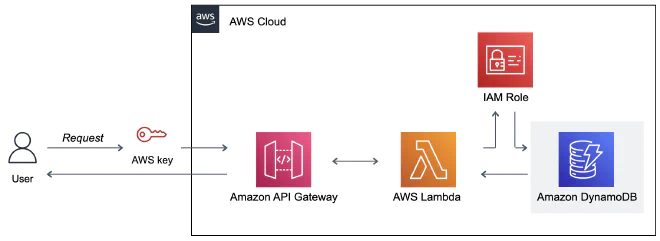
We want to collect details about different products in a table. Each product will have a record with a unique ID. One of the advantages of NoSQL is that the structure can vary from record to record, while the ID remains constant.
I recommend watching the video below for a visual explanation of what DynamoDB is, its advantages, and its uses:
Creating a New Table #
Search for DynamoDB in the AWS Console. This will take us to the page where we manage our DynamoDB tables. The next step is to create the product-inventory table.
Click the Create table button: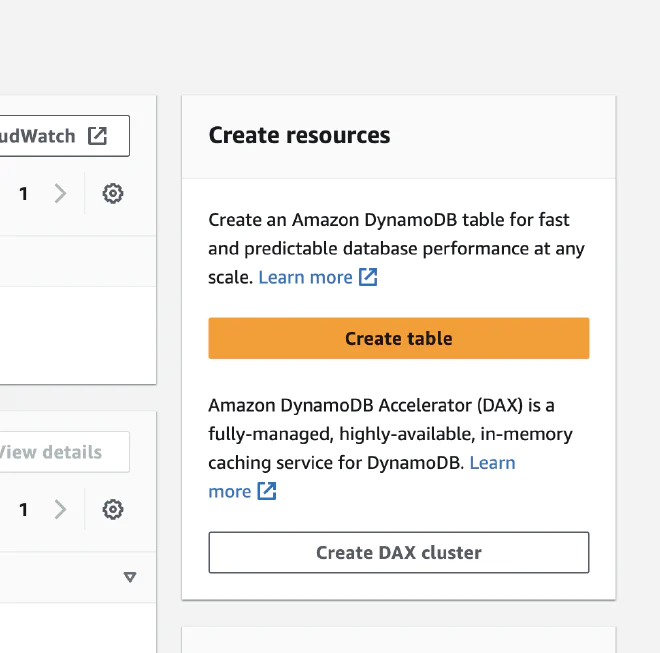
A window will now open where we’ll configure our table’s basic settings. The table name will be product-inventory. Next, we’ll define a partition key to serve as the unique identifier for each record in our table (ID). We’ll name it productId and set its type to string. For our purposes, we don’t need a sort key, which keeps the database sorted and makes searches on the table more efficient.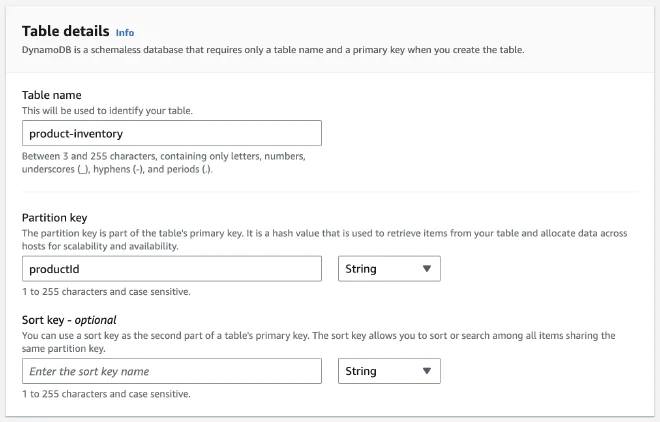
As I mentioned, unlike SQL-based databases, here we don’t have a uniform structure for all our records. The attributes can vary between records, except for the partition key and sort key.
When new tables are created, dedicated capacity and upfront billing are configured for them by default. This approach goes against the serverless approach, so we’ll want to change this setting. Under Table settings, select Customize settings. A new window will open. Under Read/write capacity settings, select On-demand so that resources for the table are allocated as needed. Then click Create table.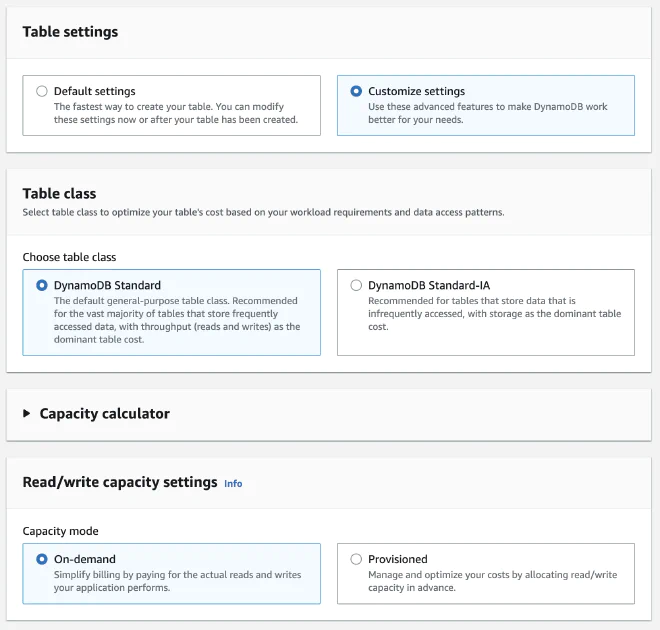
After creating a table named product-inventory, we’ve arrived at the DynamoDB main page, where we can manage all our tables in one place.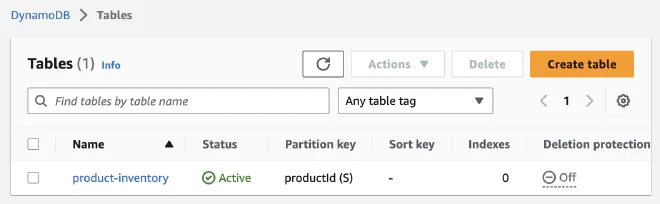
Permissions 🔑 #
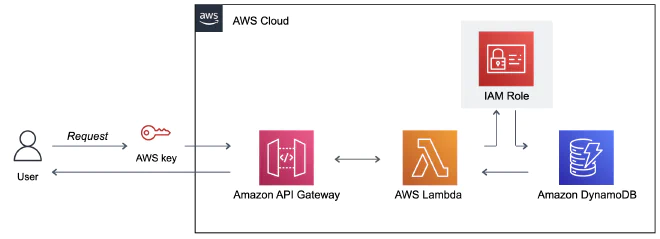
IAM stands for Identity and Access Management. This service lets us manage the security of cloud resources: who can access what, and what they can actually do. Permissions are built according to our settings, both for groups of developers and for individuals. In large organizations, IAM serves as a centralized tool for managing permission holders.
Now that we understand the purpose of this service, search for IAM in the Console, click Roles in the left-hand toolbar, and then click Create role.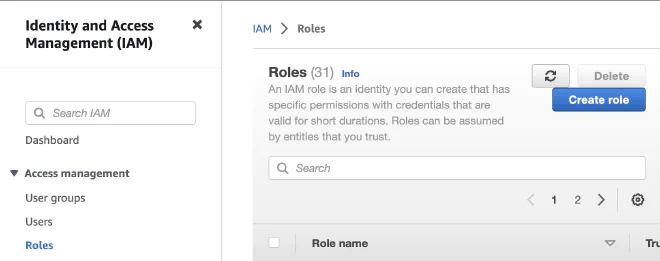
Trust Entity #
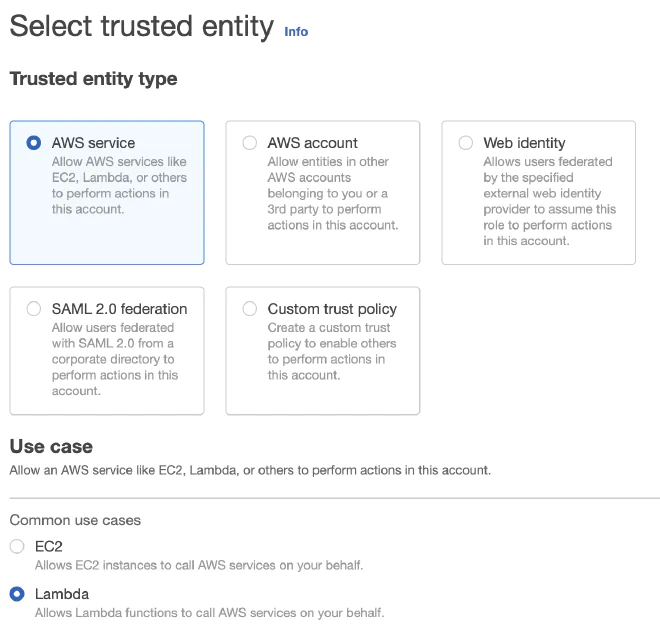
The first step is to choose the type of permissions. Select AWS service, and under Use case, select Lambda (we’ll see what that is in a moment).
Add Permissions #
AWS helps us out by offering predefined policies. A policy specifies which actions a role allows a user to perform. We’ll select two policies: the first is CloudWatch, a service that collects log output from API requests. The second is DynamoDB Full Access, so we can perform operations on our database.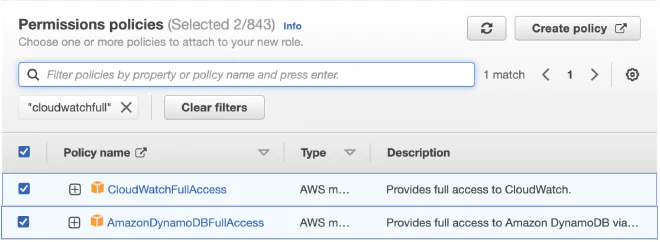
Name, Review and Create #
The third and final step is to give the role a name and verify that everything is configured as intended. We’ll name the role serverless-api-role and click the Create role button.
Setting Up Queries 👷♀️ #
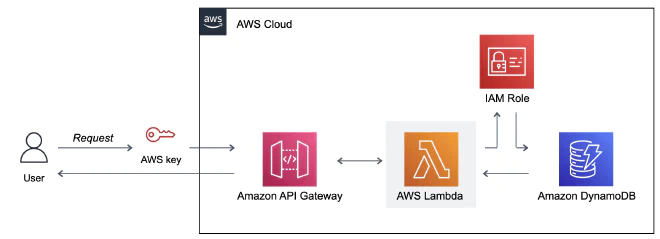
For example, to update a record in the database, we can create a function that receives the ID of the record we want to update and the new value. The function will access the record in the database and update it with that value.
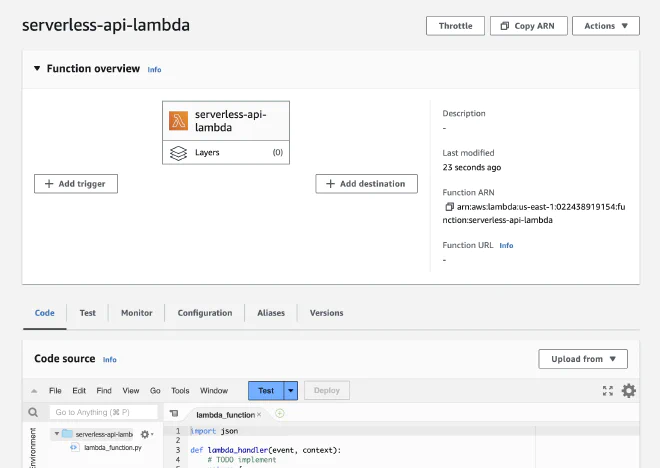
We’ll use the Lambda service to define a function through which we can perform operations on the database. Search for Lambda in the Console and click Create function.
We’ll name the function serverless-api-lambda and choose Python as the language we’ll write it in. Then, under Permissions, select the permissions role we created, serverless-api-role, so we can access our table.
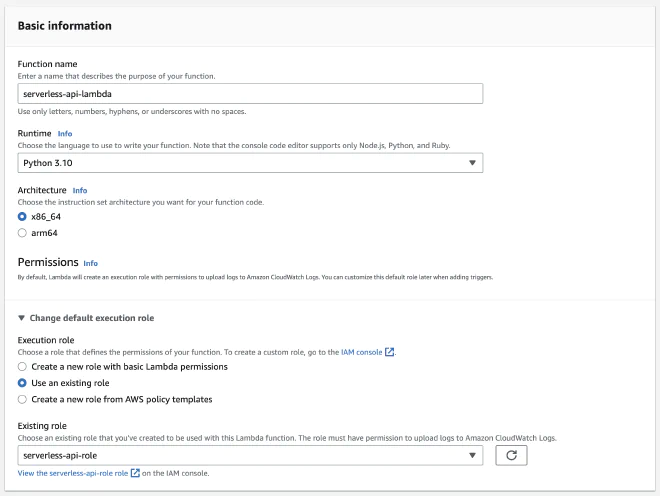
We’ve arrived at the page where we’ll later write our Lambda function. There’s one more step before we can do that.
Connectivity 🤞 #
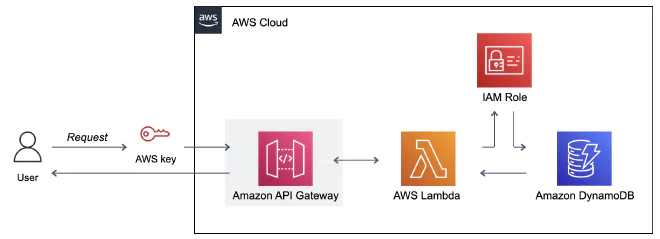
An API (short for Application Programming Interface) is a collection of procedures, operations, and tools that enable communication between software and applications. API Gateway is a service that lets us create and publish APIs in a controlled, secure, and visual way, allowing us to establish communication between Lambda functions and the DynamoDB table.
API Gateway has three main building blocks:
- Methods - HTTP operations such as GET, POST, DELETE, and so on. Each method has a Lambda function.
- Resources - Represent an object in the database (such as users, products, etc.). They are organized hierarchically and can be nested as needed. They serve as the path in the URL through which we’ll run queries.
- Endpoints - The URL through which we’ll run queries.
For example, suppose we’re building an API for a blog. We want the following operations:
- Retrieve all posts:
GET /post - Create a new post:
POST /posts - Retrieve a post:
GET /posts/{post_id} - Update a post:
PUT /posts/{post_id} - Delete a post:
DELETE /posts/{post_id}
Where do these building blocks come into play?
- Resources are represented by
posts/, which represents a collection of posts, andposts/{post_id}/, which represents a specific post. - Methods are represented by
GET,POST,PUT,DELETE. - Endpoint - The URL used to retrieve data, for example: https://your-api-id.execute-api.region.amazonaws.com/stage/posts/{post_id}.
Building an API #
Now that we understand what API Gateway is and its building blocks, search for it in the Console and start building a REST API.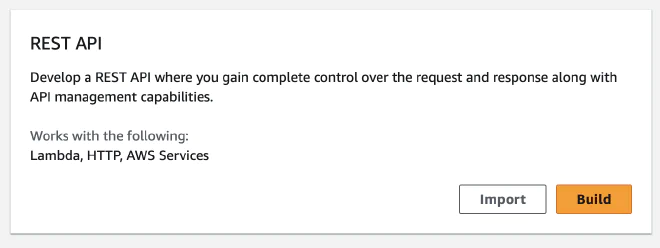
This window contains the basic settings for our new API. Select New API, then name it serverless-api.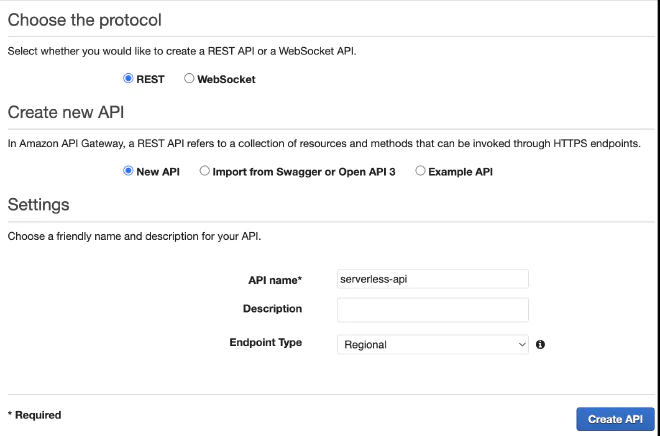
Creating Resources #
After creating an API, we’ll define resources. Click Action, then Create Resource.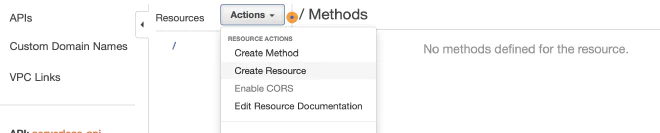
Next, enter the resource’s name and select Enable API Gateway. We’ll define three different resources: product, health, and products. Enter the names and select Enable API Gateway CORS.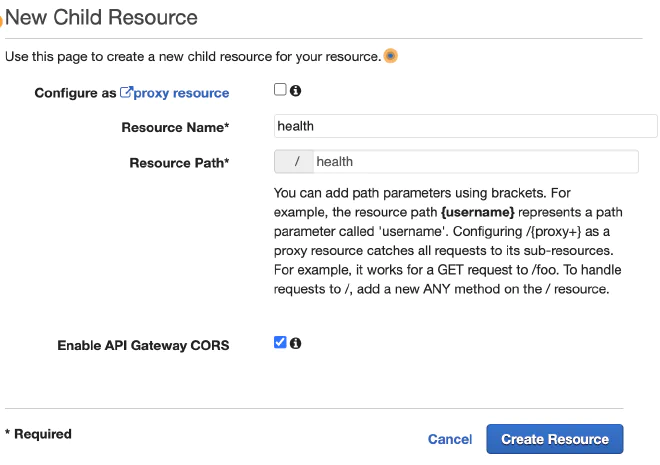
Creating Methods #
By selecting the relevant resource and clicking Actions, we can create methods for each resource. Which methods will we create, and what will they be used for?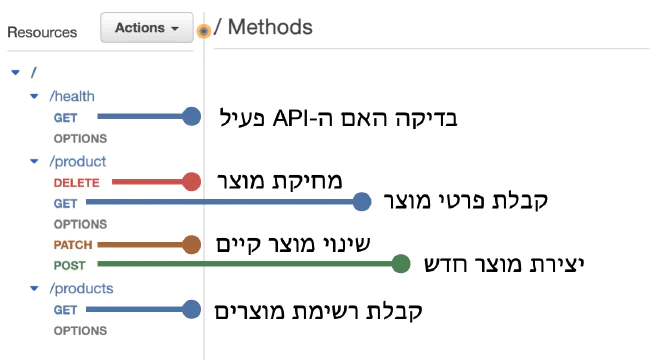
When configuring each function, select Lambda Proxy and enter the name of our Lambda function.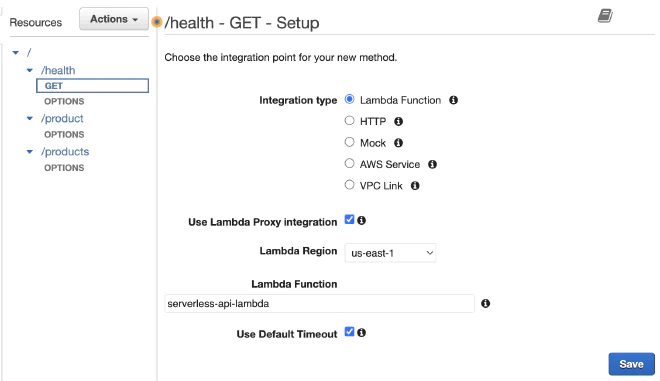
Now that we’ve set up and configured the API, the next step is to activate it. Click Action, then Deploy API. Define a new stage and name it prod. Finally, click Deploy. That’s it! We now have an endpoint, shown under Invoke URL.
Access Key #
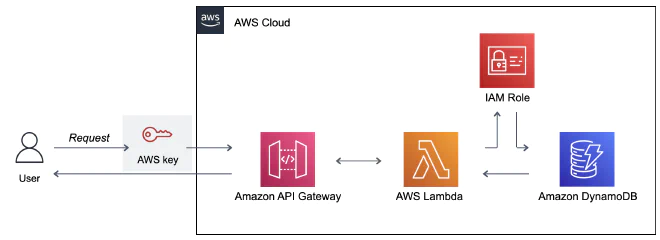
Let’s return to API Gateway and choose which methods we want to secure with a dedicated key, an API key. For example, I selected GET under health/.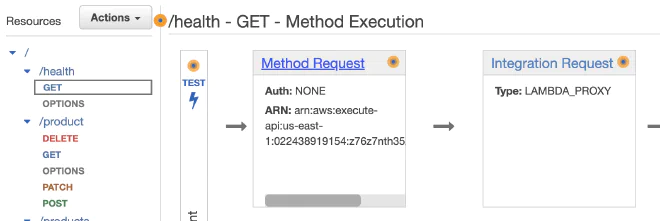
Then click Method Request, where we can require communication through an API key. Make sure you deploy the API after making the changes.
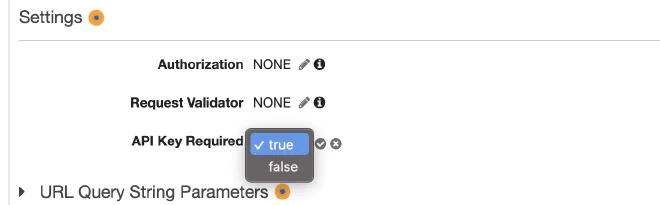
After requiring an API key for queries, we’ll create one ourselves. Under API Gateway, go to API Keys and create a new one.
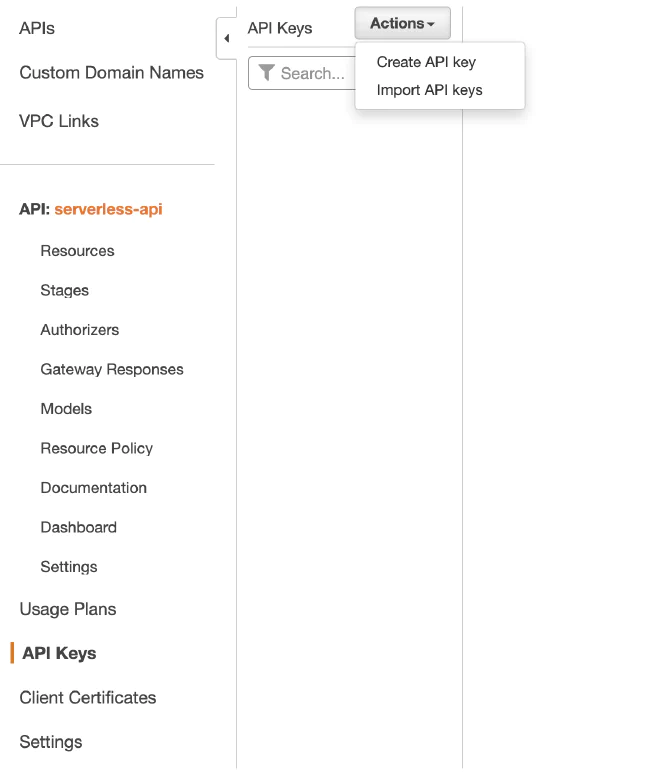
We’ll name it customer-1: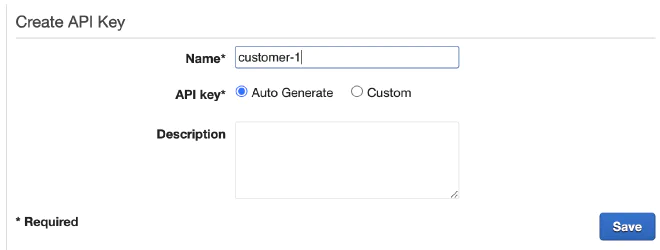
After clicking Save, we’ll reach a window where we can reveal our secret key.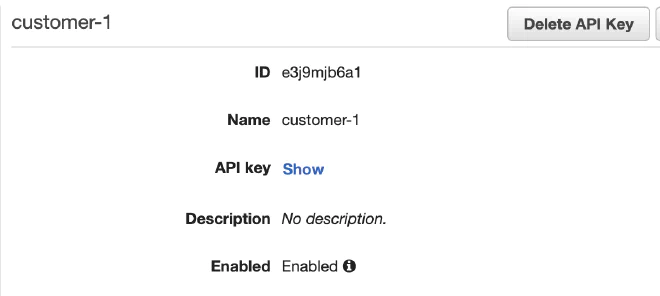
Usage Plan #
The final step in configuring the API is creating a usage plan, which helps us ensure our API isn’t used beyond what we planned. Under API Gateway, go to Usage Plan and create a new one.
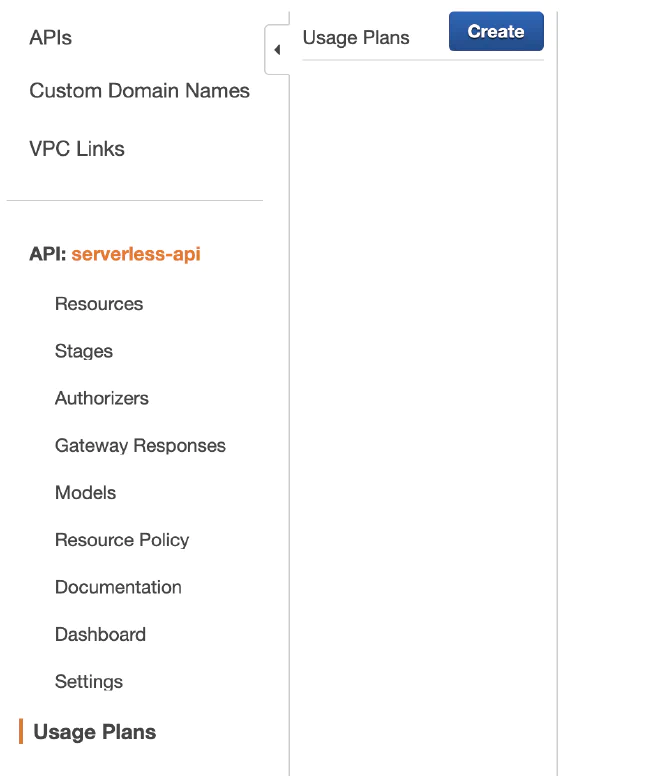
We’ll name the usage plan premium-plan and configure the usage rates: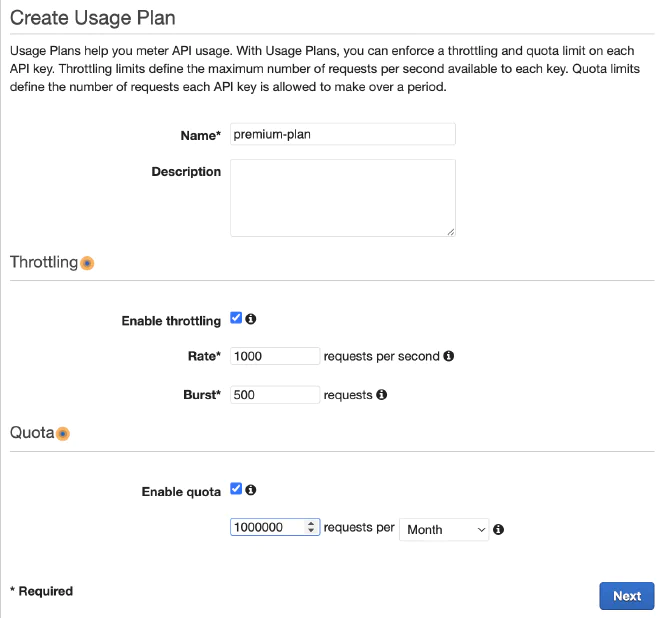
Then we’ll connect the plan to our API: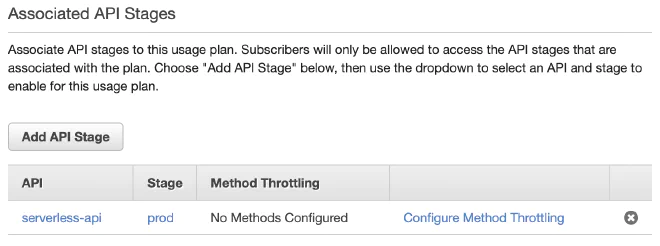
Click the Add API Key button to connect the usage plan to the API key. Then click Done: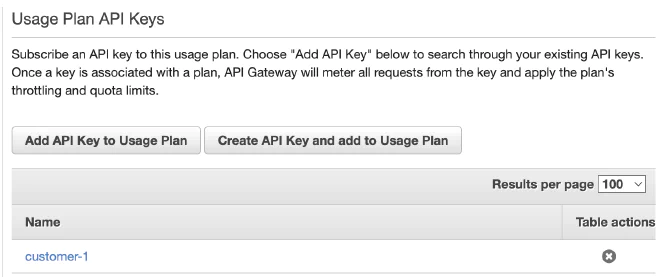
Implementing Queries 😱 #
Now that our cloud environment is ready and everything is connected and secured, we can program our Lambda function. Personally, I prefer working in an IDE rather than the Console, but that’s up to you. Before we begin, let’s think: how will we invoke a Lambda function? Through a trigger. There are different types of triggers; in our case, it’s the API Gateway we built.
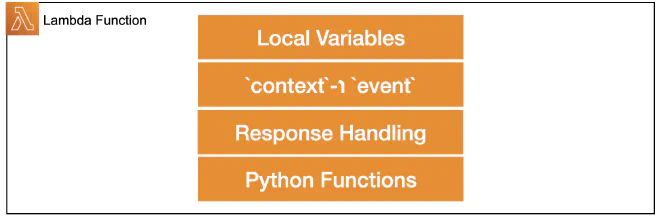
Local Variables #
First, we’ll import the libraries we’ll use: boto3, JSON, and logging.
import boto3 # AWS SDK for Python
import json # response handling
import logging # log handling
Next, we’ll define a logging object to help us record and save log messages.
logger = logging.getLogger()
logger.setLevel(logging.INFO)
In the next step, we’ll define a variable containing our table’s name and another variable containing a reference to the DynamoDB service. We’ll access our table by name:
dynamodbTableName = 'product-inventory'
dynamodb = boto3.resource('dynamodb')
table = dynamodb.Table(dynamodbTableName)
We’ll define constants that let us identify the type of API call. They are divided into methods and resources, according to the API structure we defined in the “Connectivity” section:
getMethod = 'GET'
postMethod = 'POST'
patchMethod = 'PATCH'
deleteMethod = 'DELETE'

healthPath = '/health'
productPath = '/product'
productsPath = '/products'
event and context #
When Lambda is invoked, the lambda_handler function is called, serving as the function’s entry point.
def lambda_handler(event, context):
event- Details of the trigger that invoked the function. With API Gateway, it contains information about the HTTP request:httpMethod- The HTTP method the API used, for example:GET,POST,PATCH,DELETE, and so on.path- The API endpoint through which the HTTP request was made.headers- The headers sent as part of the request.queryStringParameters- The parameters sent as part of the request URL.body- The content we received in the request. Mainly relevant toPOSTorPUTrequests.
context- Details of the runtime environment:awsRequestId- A unique value representing the current execution of the Lambda function.functionName- The name of the function that was invoked.memoryLimitInMB- The amount of memory allocated to the function.logGroupName- The Amazon CloudWatch log group associated with the function.logStreamName- The Amazon CloudWatch log stream associated with the function.getRemainingTimeInMillis- The time remaining for the function to run before it times out.
Response Handling #
Now that we understand the arguments, our next step is to distinguish between the methods we need to run and the resources they apply to.
We’ll log the event argument to help us with debugging, and store the HTTP method and path in separate variables. (The path is the resource):
def lambda_handler(event, context):
  logger.info(event)
  httpMethod = event['httpMethod']
  path = event['path']
Using the constants we defined, we can distinguish between the reasons for each call and call Python functions according to the HTTP request type. Before I explain each function, let’s create a function to build the JSON we’ll return in the response, the buildResponse function:
def buildResponse(statusCode, body=None):
    response = {
        'statusCode': statusCode,
        'headers': {
            'Context-Type': 'application/json',
            'Access-Control-Allow-Origin': '*'
        }
    }
    if body is not None:
        # objects from dynamodb in decomals, create CustomEncoder
        response['body'] = json.dumps(body, cls=CustomEncoder)
    return response
response- Our function’s response, in JSON format:statusCoderepresents the function’s status, for example 404, 500, 200, etc.headersrepresent the response format. Access to the API from anywhere is also configured usingAccess-Control-Allow-Origin.
CustomEncoder- A custom JSON encoder:- In DynamoDB tables, variables are stored with Decimal precision. This level of precision (96-bit) provides greater accuracy and represents a wider range of values than Float. JSON currently doesn’t support this, so we’ll need to convert the objects to a representation supported by JSON to avoid errors in the response.
- We’ll build a custom encoder,
CustomEncoder, to convert Decimal variables to Float. - We’ll save the encoder in a dedicated Python file named
custom_encoder.py. It’s important to add an import for this file in our main file so we can use the encoder:from custom_encoder import CustomEncoder - We’ll call the encoder using
json.dumps. - So, what does the
CustomEncoderfunction look like?
import json
from decimal import Decimal

class CustomEncoder(json.JSONEncoder):
    def default(self, obj):
        if isinstance(obj, Decimal):
            return float(obj)

        return json.JSONEncoder.default(self, obj)
Python Functions #
We’ve reached the heart of our Lambda function: the part where we check the methods and resources and call the functions. The graph below gives us a visual overview of which functions we’ll build and under what conditions we’ll call them. As a reminder, we stored a reference to our table in the global variable table, which we’ll use throughout the functions.
def lambda_handler(event, contextdef lambda_handler(event, context):
    ...
    if httpMethod == getMethod and path == healthPath:
        # 1 - GET Health

    elif httpMethod == getMethod and path == productPath:
        # 2 - GET Product

    elif httpMethod == getMethod and path == productsPath:
        # 3 - GET Products

    elif httpMethod == postMethod and path == productPath:
        # 4 - POST Product

    elif httpMethod == patchMethod and path == productPath:
        # 5 - PATCH Product

    elif httpMethod == deleteMethod and path == productPath:
        # 6 - DELETE Product

    else:
        # 7 - ERROR
GET Health- A response about the API’s operational status. We won’t create a dedicated function for this; we’ll simply return a 200 response, meaning everything is OK.
response = buildResponse(200)
GET Product- A function that receives a product ID and returns its record in the table.
response = getProduct(event['queryStringParameters']['productId'])
⬇
def getProduct(productId):
    try:
        response = table.get_item(Key={'productId': productId})
        if 'Item' in response:
            return buildResponse(200, response['Item'])
        else:
            return buildResponse(404, {'message': 'Product not found'})
    except Exception as e:
        logger.error(e)
        return buildResponse(500, {'message': 'Error getting product'})
- When calling the function, we can use
queryStringParametersto identify the ID of the product whose details were requested. - We’ll use the built-in
get_itemfunction to return the product’s record. - If we find the product, we’ll return it. If not, we’ll return error messages.
GET Products- A function that returns all the product records in our table.
response = getProducts()
⬇
def getProducts():
    try:
        items = []
        last_evaluated_key = None
        response   = {'LastEvaluatedKey': True}

        while last_evaluated_key is None or 'LastEvaluatedKey' in response:
            if last_evaluated_key:
                response = table.scan(ExclusiveStartKey=last_evaluated_key)
            else:
                response = table.scan()

            if 'Items' in response:
                items.extend(response['Items'])

            last_evaluated_key = response.get('LastEvaluatedKey')

        if items:
            return buildResponse(200, items)
        else:
            return buildResponse(404, {'message': 'No products found'})
    except Exception as e:
        logger.error(e)
        return buildResponse(500, {'message': 'Error getting products'})
- Let’s jump into the body of the loop. We’ll use
table.scanto read the table and store the result in theresponsevariable. This variable contains two types of information we’ll use:Items, the record data we retrieved, andLastEvaluatedKey, which points to the next part of the table. What does that mean? - Databases can be very large. Sometimes we don’t want to retrieve the entire table, only part of it. For example, when we’re browsing a social network, the app doesn’t load all the posts, only those close to our visible area. This principle is called paging, and it also exists in DynamoDB as the Pagination Feature. This lets us set a limit on the amount of data we can retrieve at once (1 MB by default).
- In the
itemsvariable, we’ll collect the record data fromresponseusing theextendfunction, and update thelast_evaluated_keyvariable according to the execution result. - In the loop, we’ll check whether
LastEvaluatedKeyisNone. If not, we’ll continue retrieving data. If so, we’ve finished retrieving the table’s data and can return the results.
POST Product- A function that saves a record based on the JSON it receives.
response = saveProduct(json.loads(event['body']))
⬇
def saveProduct(productBody):
    try:
        table.put_item(Item=productBody)
        return buildResponse(201, {'message': 'Product saved'})
    except Exception as e:
        logger.error(e)
        return buildResponse(500, {'message': 'Error saving product'})
- We’ll assume that the function receives all the details needed to save the product as part of the JSON. The important piece of data is
productId, which the user defines. For anyone who wants to make the function more generic, I suggest working with UUID. - We’ll take
productBodyand save it usingput_item. If an error occurs while saving, we’ll display it.
PATCH Product- This function updates the data of an existing product in the table.
requestBody = json.loads(event['body'])
response = modifyProduct(requestBody['productId'], requestBody['updateKey'], requestBody['updateValue'])
⬇
def modifyProduct(productId, updateKey, updateValue):
    try:
        response = table.update_item(
            Key={'productId': productId},
            UpdateExpression=f'SET {updateKey} = :val',
            ExpressionAttributeValues={':val': updateValue},
            ReturnValues='UPDATED_NEW'
        )

        if 'Attributes' in response:
            return buildResponse(200, response['Attributes'])
        else:
            return buildResponse(404, {'message': 'Product not found'})
    except Exception as e:
        logger.error(e)
        return buildResponse(500, {'message': 'Error updating product'})
- Before the
modifyProductfunction, we extracted the details of the product we want to update throughbodyfromevent. These details are: the product identifierproductId, the name of the column we want to updateupdateKey, and the new valueupdateValue. - As you can see, we extracted the product details beforehand rather than doing it within the function. The reason is to keep the code clean and reusable. This approach will make maintenance easier.
- Inside
try, we’ll useupdate_itemon thetableobject to save the changes:key- Defines the ID of the record we want to save, in our caseproductId.UpdateExpressionandExpressionAttributeValues- We’ll use these to define how to change data values and which data to change. Some of the operations available include setting a new value, adding a number, removing a column, and more.ReturnValues- A string defining what information should be returned after the update operation. In our case, we used theUPDATED_NEWstatement, which specifies that it will return the updated value.
- The rest of the function checks whether the update succeeded and informs the user accordingly.
DELETE Product- A function that deletes a product by ID.
requestBody = json.loads(event['body'])
response = deleteProduct(requestBody['productId'])
⬇
def deleteProduct(productId):
    try:
        response = table.delete_item(Key={'productId': productId})
        if response['ResponseMetadata']['HTTPStatusCode'] == 200:
            return buildResponse(200, {'message': 'Product deleted'})
        else:
            return buildResponse(404, {'message': 'Product not found'})
    except Exception as e:
        logger.error(e)
        return buildResponse(500, {'message': 'Error deleting product'})
- We’ll extract the ID of the product we want to delete through
bodyfromevent. - We’ll use the
delete_itemfunction from thetableobject, which receives the product’s ID and returns a corresponding status response usingResponseMetadata. - Based on the response, we’ll return a message to the user.
ERROR- If we’ve reached this point, it means there was an error in the way the request was made: the user requested something the API doesn’t support, so we’ll return 404.
response = buildResponse(404, 'Not Found')
We’ll paste lambda_handler along with all the functions we built into our Lambda function. Remember to create a file named custom_encoder.py and save the encoder we built at the beginning in it. After all the changes, we’ll deploy the function.
Postman ⚡️ #
We’re in the home stretch; all that’s left is to test the API we built. In the Console, go to API Gateway, copy the endpoint, and paste it into the URL field in Postman.
For example, I want to insert a new product into the database. Let’s build the HTTP request together:
- Paste the endpoint, then I’ll add
product/to create a URL, for example: https://{endpoint}/product. - To the left of the URL, select the POST method.
- Add our API key to the Headers. The Key will be
x-api-key, and the Value will be the string representing the key. - In the request Body, select raw and JSON. Then enter the request content, including the new product’s ID and its attributes:
{
    "productId": "131",
    "color": "red",
    "price": 1323
}
- We’ll receive a message confirming that everything was updated correctly:
{
    "message": "Product saved"
}
And that’s it, we’re done! 🥳 I’d love to hear what you’ve built using my guide. Good luck!